GitHub for Newbies
A guide on how to use GitHub for your projects, for beginners and refreshers!
You’re going to want to use GitHub for your coding projects. Whether it’s at a coding bootcamp, a software development job, or a personal project; you need to use GitHub. Let’s look at the reasons why, and the steps to follow for good GitHub usage!
Why does GitHub exist?
So, the reason for GitHub include (but are not limited to):
- Coding is an iterative process. You make big and small changes, then the code works better, or it breaks even more. You want to make sure that you can go back to a good point if there is a big mess up, or when you had a solution that was better than what is on the screen now. Version Control!
- People rarely code alone. Most projects will have multiple people working on the code at one time. Who did that ‘amazing solution’, who ‘broke everything beyond recognition’…? Collaboration!
- As a new developer, you need a place to showcase what you’ve made. How did you structure your app, how does a new-comer run the code? People learn a lot from others on the internet, so showing what you can do is not just great for jobs, but you might actually help a person learn a new technique! Portfolio!
All of this is the ‘why’ of using GitHub. It can be scary at first, especially if you are in a shared project. But with good habits and practice, you’ll wonder how you did without it.
Let’s get started!
Terms to Note:
Repository / Repo: This is the place where your code is stored on GitHub (browser). Think of it as a single building where all the code lives, from the start to the finish, old and new. All of the project’s code is housed here, in one place. It is saved online, so if your computer dies, you still have access online.
Branch / Branches: Think of a tree. The core of the tree is the main branch, or the trunk. If you are making ANY changes, it should not touch the main branch a.k.a the trunk, the core. So, when you code… make a new branch. A safe place where the code can reside without affecting the core code. This is so very important, I cannot emphasise it enough.
Pull Request / PR : So you have new code, it looks good….., how do you add it to the big ‘ole chunk of the main code? Well, with a Pull Request a.k.a PR. Your new PR is how you and your team can review the changes made. (Everyone will see a ‘before’ and ‘after’ version comparison of the code you made.) These get approved, or they cannot merge due to conflicts. You fix these and try again.
Merge Conflicts: This is when the code written, has so many changes that the previous code no longer recognizes it… This new code CANNOT be added to the current code base. Prevent this, by only make incremental (small) changes and then commit, then make more changes. Massive changes, or changes that affect some but not all of the code are usually the cause. Careful. Easy does it.
Kathleen Required: If you are following along with this, you’ll need to have a GitHub account, and if you’re really on-board with learning through this tutorial, then read GitHub’s own documentation to Get Started.
Kathleen Recommended: As part of getting set up you’ll want to set up an SSH key. While you might be able to get away with HTTPS, it’s not recommended. Want to know more? Check out this link on the why and how of setting up a SSH key.

Step 1: Create a new repository in GitHub.
- Sign into GitHub and go to your Repositories tab, underlined above in red.
- Click on the green New button, which will take you to a new screen seen below.
- Here you will name your new app. For this example, I am making a ‘chat app’, but give your app a title that makes sense and is consistent.
- Above, you’ll see that you can provide an optional description, I’ve included the basic features I plan to have.
- You can also choose to make it Public or Private. I chose Public, so my prospective employers can see my beautiful work.
- You might want to add a README file, it is just good practice and can be filled with information on how to use the app, what libraries you used, and so on.
README file: please note that commands such as create-react-app will make a new README file for you, so when you do the above — you might make a duplicate. Only have one README file per repository.
- I have added a .gitignore file. The “git ignore” file is just a text file that lists the files or directories to not pay attention to, when you are adding and committing files.
.gitignore file: Again, commands such as create-react-app will make a new .gitignore file for you, careful with duplicates (you can always delete extras later. But to be safe, just choose this option regardless!)
- Chose the a template for gitignore — I picked Node.js — because that is what I will be using in this example. If you need a different one, now’s your chance. More on this is here: https://www.bmc.com/blogs/gitignore/
- No need for a license, especially for beginners like yourself.
- Click the green Create Repository and you are on your way!

2. Putting your new repo on your local machine
Above you can see the newly created empty repository on GitHub (in my browser). It has no code, just the README file and the .gitignore file.
Right now, it is devoid of code, obviously — because you have not added any yet. But, this exists on GitHub as a place to store your code. You have set up a placeholder, a folder, a nook to put code into for your project.
- Click on the green Code drop-down menu and choose the SSH key option.
SSH Key: so the HTTPS option was kinda almost phased out by GitHub in 2020. For security you’ll probably need to set up an SSH key. Check out this article to learn more on both options.
- Copy that SSH Key (Ctrl C) and then on your computer, open up your IDE. (IDE = integrated development environment, meaning VSCode, Xcode, WebStorm, etc. For this example, I will be using VSCode.
- On the Get Started screen of Visual Studio Code you will see a list of starter options like so:
- Click on third option under Start: the Clone Git Repository.
We want to pull down the repository we just created on the GitHub website. This is so we can start working on our local computer in a file, and then committing code on the same file within GitHub. All our code needs live on our computer and also on GitHub.
After clicking Clone Git Repository, a new text input field will appear at the top of the VSCode program window.
- Above is where you paste in your SSH key you copied from that Git repository.
- After pasting it in, you will have a pop-up window appear like the below one.

It is asking where you want to save this folder on your local machine. We’re making a local folder to store the code we are going to write on our own computer.
And we are linking these together as one and the same.
Now is the time to be careful with file names, file management, common sense, and what-would-future-you think-to-look-for. Remember to be consistent. I called this ‘chat-app’ in GitHub, so on my computer it should also be named ‘chat-app’ (in a folder that makes sense….. not the Downloads folder, and probably not Desktop, just FYI).
- Pick your spot on your local computer and save.
- You will then be asked if you would like to open that repo in VS Code. It may be on the bottom right-hand corner of VSCode.
- Open it up with either button to get coding!
I say ‘get coding’, I mean that now you will have a VSCode file to work on that is linked to your GitHub repo.
Essentially, you should see an identical match of the current Github repo (as seen on the GitHub website) but now, this is on your local machine. (All we have is 2 files: a .gitignore and a README)
All the code you write in this file using VSCode, will need to be added and committed to GitHub in the usual fashion. More on that in a bit.
3. Adding Code To Your App
Grand, so you have a GitHub repo online, and you have a local file open in VScode- both have zero code so far.
Inside VSCode open up your Terminal.
The terminal should appear at the bottom of VScode. Within the terminal you should already be in the right directory. But double check, make sure it makes sense.
If not, you’ll need to become familiar with the correct terminal commands. Terminal commands are essential so learn some below:
If you are not familiar with these, play around before you start coding. Get comfortable with the below basics.
pwd
cd
ls
Once you’re happy and understanding what each one of the above does, then move on. Remember , if you have moved around, check again that you are in the correct file before you start coding. If all else fails, close and re-open VSCode.
Now, try typing in something in the VSCode terminal like the below:
npx create-react-app insert-your-app-name-here
This will add a new react application in this directory, the insert-your-app-name-here is the name of your React app. In the below example, I have called it chat-app. You can use your own starter code for non-React projects. This is just an example.
This will run for a good while, see the above incomplete install bar in the process of loading?
Now it is installing the necessary things such as React, React DOM, package.json, public folder, src folder, and so many other things that you’ll need later while coding. Good Stuff!
Great, second level coming hot now: don’t panic (I did the first few times). You are going to see some ‘concerning’ things below:
- Installing dependences is good, we will absolutely need these in future! What Are Dependencies?
- Yellow npm WARN thingys: scary, I know. But all-in-all, these just happen. You have not broken anything. Sometimes there are requirements that could help but aren’t included… or versions that are more up to date, or vulnerabilities for your installation. You’re okay!
- Trust me: everything is fine, seeing this is good. If you see something else, it’s time for a different tutorial.
- Now final stage/screen:
Success!!! Happy Hacking is a message from React, depending on the starter code you are using, it might look different.
We have an app from create-react-app!
And we can start the app in our browser: where is it?
In the new README created by our create-react-app command, we can see that the app runs on http://localhost:3000…usually.
So, in the terminal of VSCode, type in:
npm start
This will open a new browser tab and you will see a very plain React app running on localhost:3000.
Great, pat yourself on the back, it’s an app! (A very sparse app, but it’s there!)
4. Clean up the created app
Now, look at your file structure, we don’t need all of these extra files. And we need to choose which README file we want to keep.
So, time to trim the fat.
For this app, I am going to delete the following:
- README.old.md: You can choose your own one (created via GitHub browser), but either way, there should only be one README.
- src folder: This has so much extra stuff in there, you would usually want a clean slate. So, delete this entire folder and then create a new empty src folder.
- In my new src folder I create a new empty index.js file.
In the public folder, I am going to get rid of the following:
- logo192.png
- log512.png
- robots.txt
When we have done this, we run the start command again from the terminal:
npm start
You should see a blank white page in your browser. Ah, nice, fresh and clean!
And, your files in VSCode will now look like this:
Great, excited? I know I am! So much potential!
Before we do anything else. We’re going to something SUPER important for GitHub version control.
New piece of information: see the beginning of this article: there are ‘branches’ in GitHub.
5. Branches in GitHub
Branches in GitHub are part of good practice, part of version control, and you can read more about them here. Honestly, if you read none of my links, except one…. this is the one I cannot recommend enough.
Find out what branch you’re on using the following command in the terminal:
git branch
Ruh-Row… we’re on the ‘main’ branch…. no bueno!!!!
There is also an old branch I made before this tutorial, called chatEngine. Ignore this for this tutorial.
Main branch v.s. new branch
By default you will be starting on the ‘main’ branch.
This is bad. As a beginner rule: Never. Ever. EVER. Be. On. MAIN. Now is your chance to move away from the trunk (core) of the code. Time to create a new branch.
If at any stage you are not sure what branch you are on, check it using the git branch command. If it’s main, change it now. If it’s an old branch that is unrelated to your current task, make a new relevant branch.
You want to separate your code where it makes sense. Separation of concerns. And FYI, having a single branch that all code goes to that isn’t main — can be just as bad and being on main. You could confuse everyone that has access to the repository, mostly yourself. One branch per code feature is a good rule.
So create a new branch with this terminal command:
git checkout -b what-ever-the-new-branch-name-is-here
Name the branch something that is very simple — to the core of what you are trying to accomplish on this branch. A bug fix, a feature addition, one thing.
No spaces, no capital letters. Short and sweet. Examples include: bug-fix-login, add-new-cart, etc, you get the idea.
Check what branch you are on with the terminal command:
git branch
See how were have made a new branch called: inital-app (misspelled).The main branch is still there. But the green one, with the asterisk: “ * ” is the one we are on currently. By creating a new branch you automatically switch to be on that newly created one.
Great. The main branch is safe for now. And, you can code to your hearts’ content. Remember: small changes!
6. Adding and committing code to GitHub
Okay, so after you have added some code or changed some existing code, we have 3 steps left inside VSCode.
- Add
- Commit
- Push
Save all your files on VSCode.
In the terminal we’re going to type a the three important commands. Take it slowly.
Firstly, you need to add the changed files:
git add .
This will add all files you have changed. The “.” after add means all files that were changed. But in the terminal nothing changes or appears. Did it work? Check if it worked using this command:
git status
The git status command will list out
- On branch: shows what branch you are currently on (great to know and to check at all times)
- Green files: all the files that were changed and hence will be uploaded to the GitHub repo.
Note: Do not have this many files in your status!
For these screenshots, I have used an old project that never made it to GitHub. I made the app in full, without adding any code to GitHub, hence there a so many folders in green being added.
If your status looks like this: you NEED to make far more frequent commits to GitHub. I am using this repo for screenshots, and it does not reflect my own GitHub behaviour.
That’s important, mostly for my own GitHub reputation!
The status says ‘stages to be committed’. Good. These files are in the staging area. The “staging area” just means that these files are going to be part of the next commit.
Wait, what if you made a mistake? Such as, you realise all your debugging comments are still on those files?
If you don’t want to add these files because they’re messy or wrong, there is a way to save and undo the adding of files. It is a terminal command called:
git stash
The git stash command will put those added files somewhere else. Where? Who knows?! Haha! But seriously, if you need them back check out this StackOverFlow link for recovering stashed files.
Or, if you’re happy with all the changes, we can commit without stashing. In the terminal type in:
git commit — m ‘adds the feature as part of the task, fixes something’
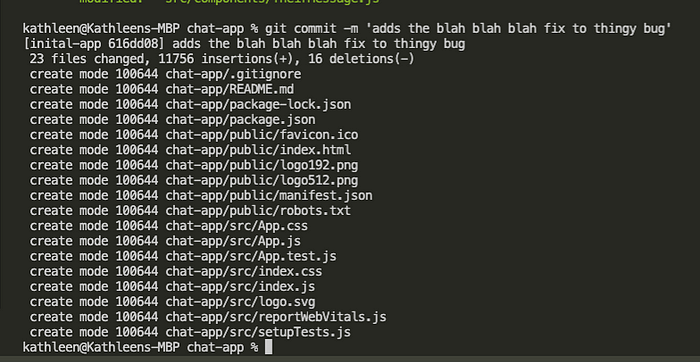
Anything after -m is the message of the commit. Here, I have given the commit message the words of “ blah blah blah fix to thingy bug”.
It will appear on GitHub. It will appear on every single file you have changed.
Things to note on the potential commit message:
- Put it in the present tense.
- Make it applicable to the branch, to the bug, to the task.
- Keep it short and descriptive.
Great, files were added, they’ve been committed. But, we are not done. The files can not be merged on GitHub until we do the final step. We need to ‘push’ the changes. Pushing them up will create the Pull Request (PR). The PR can be reviewed by you and your peers, and hopefully added to the current main chunk of code.
So in the terminal you need to type in
git push origin name-of-the-current-branch
Below my current branch is misspelled, so I type in git push origin inital-app

The files that have been added and committed are now pushed up to GitHub.
When you go to your GitHub browser window and refresh the page, you’ll see the below.
There is a new recent PR in yellow at the top of the Code page. Click on the green button Compare & pull request.

You’ll be taken to a new page within GitHub. This is where you will compare and most importantly, add comments to your changes. You’ll want to briefly explain what your code does.
Even if you think it’s obvious, future-you or other team-members might not know immediately what you did. Add some comments like so:

You definitely want to see the green check mark of ‘Able to merge’ at the top of the screen. Great sign. If you don’t see that, then you probably made changes that are so big that they cannot merge with the main branch. If that happens, google: merge conflict resolution.
Sometimes you can resolve merge conflicts within GitHub, other times it is a big problem that involves a slow un-doing of the code. You pick away and fix the code until it is fit to merge with the current code base. That’s a problem for another tutorial.
Once you add your comments, click the green Create pull request button. Now a new pull request (PR) will be created.
Either you, a team-member or a manager will need to approve the code.
They will look at a comparison of the old code v.s. your new code. And provided it all makes sense, looks neat and doesn’t break anything — it will be approved and added to the main branch.
You can then delete your branch. Or just create a new one for your future task(s).
To delete a branch in your terminal use:
git branch -d name-of-the-branch-to-be-deleted
The -d option will delete the branch only if it has already been pushed and merged with the remote branch.
If you have not pushed or merged a given branch, but still need to delete, you could use -D instead. This will force the branch to be deleted. Use with caution!
You can also delete branches within GitHub.
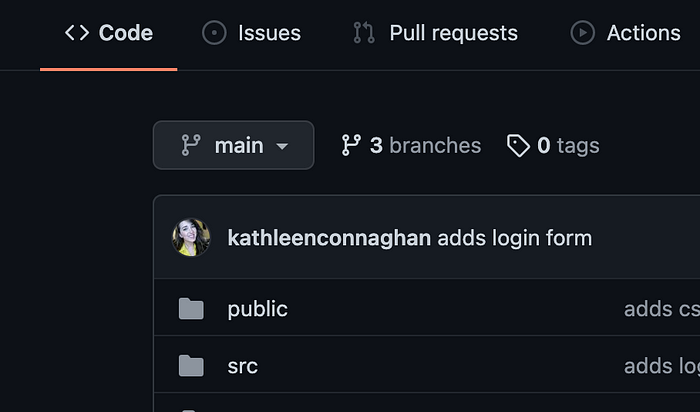
In GitHub, click on the branches next to main. Shown above for 3 branches. This will take you to the following screen:

Above you can see the default branch (always main) and your branches: inital-app, chatEngine. You see that chatEngine branch has been merged, inital-app has not. But there is a little red rubbish bin on the right hand side. Clicking it will delete the corresponding branch.
Only delete branches after the have been merged.
You don’t have to delete them, but in larger projects it is cleaner.
Final Words
Great stuff. You made it, and if you got all that, you’ve done well. That was not easy. It was a lot of information.
There’s a lot that goes into an app. There’s code (which we did not cover in this article) and there’s controlling how that code can integrate with other user’s code, and with the current code. That may be a new frontier for many beginners. It a scary place to be in, adding your code to the bigger picture, having people view and critique your code.
Do be careful. But don’t be afraid. Mistakes will happen. Any and all criticisms will only make you a better coder. Don’t get precious about your code, accept that you don’t know everything. And in the mean time, try to not break anyone else’s work.
Commands like git stash can’t save every error. Merge conflicts happen, despite our best efforts as beginners. No one died. It will be okay.
Most importantly, from the greatest (scariest) mistakes — we learn the most. Sometimes it just needs to happen. Practice makes perfect. It may seem like a lot of steps; but in time, you will do it without google and without self-doubt.
I hope this provided the guidance needed, all in one place. I hope now GitHub is a joy to use, and a vital tool for your coding future.
❤ Thank you for reading! ❤